We've got two major production events coming up, the first is an interview session that we'll be shooting with the two "mechanics" featured in the film who will discuss their project bikes, their current progress and their expectations for the next few months leading up to the spring 'run.
Secondly we have secured an interview with Lyall Sharer (Sr.), one of the Slimey Crud's and owner of Sharer Cycle Center in Verona, WI. We are particularly excited about this interview and hope to learn more about the origin of the run and the Slimey Crud Motorcycle Gang.
In related events, our last documentary release, "Breakdown" has been selected by the Beloit International Film Festival and will be screening on January 18th, 2008. You can find out more about "Breakdown" at BIFF by visiting the production company's website at http://2soc.net
Wednesday, December 26, 2007
Wednesday, November 28, 2007
Parts, parts parts!
The carb kit arrived (I decided to go with the carb kit) and seeing all those bright, shiny bits gets me all revved up to be working on the bike. Now that I can finally re-assemble the carbs I'm thinking about doing some kind of crazy stop-action animation of the assembly or a dramatic montage of the process...
...or maybe I should just get it done...
As far as the rest of the movie goes, things are going well and we've got the first interview under our belts. I should be able to post a few stills from that day shortly, Mike was busy with the clicky-clicky camera that day so we might have some real photographs (as opposed to frames swiped from the film).
The next thing I need to concentrate on is setting up the remaining interviews. From some of the emails I've received and the statistics for this and our company website (http://2soc.net) it looks like interest is growing in the project and we've received many kind words from motorcyclists out there anxious to see the finished product. As of now we're still on schedule for 2008 and if everything goes as planned we should be screening the film in the late summer/early fall. It's wayyy to early to be talking about release dates but anyone reading this blog should already be accustomed to seeing things change from week to week.
If we have time we may begin posting some video from the film as it progresses. It's allot more work than just typing and posting random pictures, but if there is interest from the audience that might motivate us to exert the effort. Drop us a comment here if that's something you'd like to see.
For now, I should get back to those carburetors...
Thursday, November 8, 2007
Unrelated Updates
This last weekend we shot our first formal interview with Bill from Motorcycle Performance. While we're in the process of logging the footage and checking out the audio, we also finally released our most recent short film "The Mark" as part of Fox's Storyteller competition on myspace.com.
Check out the film at the URL below and vote for us!
http://myspacetv.com/index.cfm?fuseaction=vids.individual&videoid=21701103
Check out the film at the URL below and vote for us!
http://myspacetv.com/index.cfm?fuseaction=vids.individual&videoid=21701103
Thursday, October 18, 2007
First "formal" interviews scheduled.
On November 3rd we'll be sitting down with Bill from Motorcycle Performance to discuss The Crud Run, The Slimy Crud Motorcycle Gang and some of Bill's current projects as well. This kicks off the "historical" stage of the project and we are looking forward to seeing what Bill has to say.
Bill has a great shop in Madison, WI where he sells new and used bikes and has probably the most skilled service shop in the area. These guys do some incredible work and run their own racing team as well. We've done business with Bill for years but this will be the first time we've had a chance to sit down with him and discuss motorcycling.
On the CL350 front not a lot of progress has been made of late, mainly due to the DVD release of "Breakdown" and it's screening at the Edgerton Book and Film Festival, where it took home the "Best of Edgerton" award. Now that the DVD is out and the festival is over I should have a little more time to spend on the bike, I just have to decide how deep to go in the disassembly.
Monday, September 10, 2007
On again, off again
Last Sunday marked the first day of production on The Crud Run Diaries. For this day’s shoot we filmed the next step in preparing the CL for the spring run.

If you remember from a previous post, my last attempt to start the bike ended with one carb bleeding gas and the other passing nothing but air to the cylinder. This being the case I decided the next step is to pull the carbs back off the bike and clean them up properly before attempting to use them again.
This, of course requires removing pretty much everything that I’ve re-installed since I received the bike a few months back. You see, the super-cool high exhaust pipes make removing the left-side cover impossible (as far as I can tell), and you need to remove the cover to remove the carb, so off comes the exhaust system again.
So, after about 20 minutes of disassembly, the carbs once again rest on the cement of my driveway and we’re ready to tear into them.
Off to the basement we go and I first pull the bowls off and drop the parts into a little muffin tray. An initial visual inspection doesn’t reveal any reason that one of these (of course, I can’t remember which one it was) would leak gas like a Badger fan in October, so we’re going to look further.
I the pulled the top of the carb off and pulled out the slides and their diaphragms and didn’t see anything suspect there either. Looks like we’re just going to be doing this the hard way.
So we headed out to Auto Zone for a bucket of Chem Dip. This time we’ll properly scrub these puppies up since we can’t find the actual problem; we’ll just try to put them back on the bike in the best condition possible.
After removing the first carb from the dip it looked pretty damn good!
So tonight the second carb will soak and after that the associated parts that I removed during the initial disassembly (bowls, jets, etc.).
Later that night I was back on Ebay searching for various parts and found complete carb rebuild kits for this bike for about $30.00. I’m wondering if, since they are off the bike and in pieces if I might as well pick one of these up and properly rebuild the carbs. I didn’t see any damage to the components included in this kit (needles, jets, float bowl gasket, etc.) but obviously there is something leaking somewhere and for $30.00 now it would be nice to eliminate as many variables as possible.
Friday, August 31, 2007
Rolling
The Crud Run Diaries has finally been "greenlighted" by the second society. What this means is that it will now occupy an "official" spot on the production schedule and things should really start rolling from here.
What happens next is we will be scheduling interviews with anyone involved in the Run's history as well as time to record major mechanical work on the project bikes (which means I need to get a list of to-fix items for the CL). The first of these sessions will be recorded on September 9th so I'll have more to report on after that.
A few other decisions have been made and due to scheduling conflicts (and frankly, lack of progress on the project bikes) we're targeting the spring Run of 2008 to get the bikes running and on the road. This will give us most of the winter to get the work done, and since we live in Wisconsin, there's not a lot else to do, really…
In the meantime we are looking for stories from anyone who participates or even knows something about The Slimy Crud Run. If you or someone you know falls into this category drop a comment on this post and we'll get in touch.
Thursday, July 12, 2007
Photographs
Finally got around to adding the pictures to the last post.
So far I'm loving the VQ1005, and so is Libby:
So far I'm loving the VQ1005, and so is Libby:
Friday, June 29, 2007
Turning Point
So last weekend I had a little time during a visit from the sister-in-law and nephew and was able to get the remaining (important) parts left in the "basket" that came with the bike and attach them where they belong.

Lib and I hit the local AutoZone and picked up a fresh pair of plugs. When we got back I showed her how they work by plugging one in and laying it on the head while she turned over the motor. Not the fattest sparks I've seen but then again we were working in direct sunlight.
Once the plugs were in place all that remained was to attach the left-side carb and then rig up the Fuel IV. Attaching this carb was trickier than the other due to the oh-so-cool-but-always-in-the-way high pipes the exit on the left side (I'm not 100% sure but I think you have to remove the exhaust to get the left side-cover off…rather un-Honda). Finally the carb was mounted and even the crazy choke linkage was working properly.
Now back when I started this project I debated whether I should properly "rebuild" the bike or just put it back together and see if it works. Under different circumstances I would have opted for the former but as the deadline of the next Crud Run looms, I found the latter more prudent. I decided that I would put the bike back together with minimal "tweaking" and if it runs, then we'll just fix whatever problems come up. If not; well then it's time to take it apart and restore it properly.
Once the parts were in place I pulled the gas tank and the seat and prepared to wire up the Fuel IV. Since the tank is old and rusty, not to mention the unknown state of the petcocks I decided the best way to test run the motor would be to build some MASH-style apparatus that would let me get a little fuel to the carbs without using the regular fuel tank. What I came up with consists of a length of fuel line, a "T" connector and a small plastic bottle which once contained airsoft pellets.

The airsoft bottle was perfect because it already had a neat little spout that would hold the fuel line snugly. There were some other potential design problems but I just ignored them for this first test. JC Whitney sells a more sophisticated version of this tool for something like $60.00 which was way more than I needed to spend so I decided to go the DIY route.
After cutting the lengths of hose and fitting them to the "T" it took a little doing to get the hose connected to the carbs (especially the left one…stupid pipes!) but finally it was done and we were ready to test-fire the motor.
I filled the bottle about half-way with fuel; the entire apparatus was untested so I wanted to use the smallest amount of gasoline possible should it just spill all over the place. After filling the bottle it was screwed to it's top and then inverted, and you could see the fuel flowing down the lines and into the carburetors.
Ignition on, hit the starter…nothing.
Well almost nothing. Fuel begins to spill on the ground from the overflow on the right-side (high) carburetor. I quickly attach the rotted overflow hose to stop it from running all over the engine. Well we know fuel is getting to the carb, let's try turning it over again and see what happens…
Nothing.
I flip the fuel bottle over to stop the flow and examine the carburetors. The right-side carb (which is higher than the left as the bike is on the side-stand) is clean but looks like it dumped all the fuel that went into it on the ground. The left-side carb, which didn't eject anything out of it's overflow is now starting to seep fuel from around the float bowl. I pull the plugs to see what's getting into the chamber and they are both bone dry.
I guess the carbs are not in as good of shape as I had previously observed.
I turn the drain screws on the carb bowls and let the remaining fuel drain down onto the engine and drip from there into the fuel bottle I was previously using to feed the engine. There is a nice little "low-point" cooling fin on the bottom of the motor that almost magically collects all the fuel running over the crankcase neatly into one spot where it can easily be collected. Nice to know…
I spent that night considering the meaning of the day's events and deciding what the next best plan of action would be. Based on my original criteria, it was probably time for a rebuild, but fixing carburetors is a lot easier than that. However what's to say once the carbs are "on-line" that there wont' be another problem waiting in the wings? Finally I came up with three options:
1. Go down the rabbit hole, beginning with rebuilding the carbs
2. Tear the bike down to the frame and begin a proper restoration
3. Convert it to electric drive
I gave these three options about 48 hours of contemplation and came up with a hybrid solution. I realized that going down the path of troubleshooting each discreet problem as it arose could be a long process with nothing but failure until finally everything worked right (at least for awhile). I seriously considered the electric option, but there is a significant up-front cost that (at least for now) seems to exceed the cost of any other option.
In the end I realized that even going electric would require (or at least, desire) a rebuild of the rolling chassis so that is where I plan to begin. Ignoring the engine and related things for now, I plan to pull the bike apart and restore the rolling chassis to new (or better-than-new) condition. During this time I'll continue to evaluate electric conversion options and hopefully come to a solid conclusion by the time the chassis is restored and the time comes to deal with the engine.
I have a feeling I'll have plenty of time to think about this.

Lib and I hit the local AutoZone and picked up a fresh pair of plugs. When we got back I showed her how they work by plugging one in and laying it on the head while she turned over the motor. Not the fattest sparks I've seen but then again we were working in direct sunlight.
Once the plugs were in place all that remained was to attach the left-side carb and then rig up the Fuel IV. Attaching this carb was trickier than the other due to the oh-so-cool-but-always-in-the-way high pipes the exit on the left side (I'm not 100% sure but I think you have to remove the exhaust to get the left side-cover off…rather un-Honda). Finally the carb was mounted and even the crazy choke linkage was working properly.
Now back when I started this project I debated whether I should properly "rebuild" the bike or just put it back together and see if it works. Under different circumstances I would have opted for the former but as the deadline of the next Crud Run looms, I found the latter more prudent. I decided that I would put the bike back together with minimal "tweaking" and if it runs, then we'll just fix whatever problems come up. If not; well then it's time to take it apart and restore it properly.
Once the parts were in place I pulled the gas tank and the seat and prepared to wire up the Fuel IV. Since the tank is old and rusty, not to mention the unknown state of the petcocks I decided the best way to test run the motor would be to build some MASH-style apparatus that would let me get a little fuel to the carbs without using the regular fuel tank. What I came up with consists of a length of fuel line, a "T" connector and a small plastic bottle which once contained airsoft pellets.
The airsoft bottle was perfect because it already had a neat little spout that would hold the fuel line snugly. There were some other potential design problems but I just ignored them for this first test. JC Whitney sells a more sophisticated version of this tool for something like $60.00 which was way more than I needed to spend so I decided to go the DIY route.
After cutting the lengths of hose and fitting them to the "T" it took a little doing to get the hose connected to the carbs (especially the left one…stupid pipes!) but finally it was done and we were ready to test-fire the motor.
I filled the bottle about half-way with fuel; the entire apparatus was untested so I wanted to use the smallest amount of gasoline possible should it just spill all over the place. After filling the bottle it was screwed to it's top and then inverted, and you could see the fuel flowing down the lines and into the carburetors.
Ignition on, hit the starter…nothing.
Well almost nothing. Fuel begins to spill on the ground from the overflow on the right-side (high) carburetor. I quickly attach the rotted overflow hose to stop it from running all over the engine. Well we know fuel is getting to the carb, let's try turning it over again and see what happens…
Nothing.
I flip the fuel bottle over to stop the flow and examine the carburetors. The right-side carb (which is higher than the left as the bike is on the side-stand) is clean but looks like it dumped all the fuel that went into it on the ground. The left-side carb, which didn't eject anything out of it's overflow is now starting to seep fuel from around the float bowl. I pull the plugs to see what's getting into the chamber and they are both bone dry.
I guess the carbs are not in as good of shape as I had previously observed.
I turn the drain screws on the carb bowls and let the remaining fuel drain down onto the engine and drip from there into the fuel bottle I was previously using to feed the engine. There is a nice little "low-point" cooling fin on the bottom of the motor that almost magically collects all the fuel running over the crankcase neatly into one spot where it can easily be collected. Nice to know…
I spent that night considering the meaning of the day's events and deciding what the next best plan of action would be. Based on my original criteria, it was probably time for a rebuild, but fixing carburetors is a lot easier than that. However what's to say once the carbs are "on-line" that there wont' be another problem waiting in the wings? Finally I came up with three options:
1. Go down the rabbit hole, beginning with rebuilding the carbs
2. Tear the bike down to the frame and begin a proper restoration
3. Convert it to electric drive
I gave these three options about 48 hours of contemplation and came up with a hybrid solution. I realized that going down the path of troubleshooting each discreet problem as it arose could be a long process with nothing but failure until finally everything worked right (at least for awhile). I seriously considered the electric option, but there is a significant up-front cost that (at least for now) seems to exceed the cost of any other option.
In the end I realized that even going electric would require (or at least, desire) a rebuild of the rolling chassis so that is where I plan to begin. Ignoring the engine and related things for now, I plan to pull the bike apart and restore the rolling chassis to new (or better-than-new) condition. During this time I'll continue to evaluate electric conversion options and hopefully come to a solid conclusion by the time the chassis is restored and the time comes to deal with the engine.
I have a feeling I'll have plenty of time to think about this.
Monday, June 18, 2007
Re-store
I'm re-considering a frame-up restoration.

On one hand I think doing so will definitely blow my deadline of getting the bike rideable in time for the fall crud. On the other hand, maybe having it in boxes in all over the garage will motivate me to make more time for the project.
Six of one…
 I blame Brillo, because I finally got around to giving them a try on the bike's chrome (one of the mufflers and the gas cap) and I was shocked to see that it actually worked to remove the decades of rust from the surface, leaving it as brilliant as a mirror. Seeing those funky Jetsons-esque cans glimmer in the daylight made me re-think the whole "get it done now and make it pretty later" attitude of this project so far.
Also the girls picked out some great colors for a new paint job and it would just be easier to do a good job of that with the parts all…apart.
I'll give it a week to decide.
On one hand I think doing so will definitely blow my deadline of getting the bike rideable in time for the fall crud. On the other hand, maybe having it in boxes in all over the garage will motivate me to make more time for the project.
Six of one…
I blame Brillo, because I finally got around to giving them a try on the bike's chrome (one of the mufflers and the gas cap) and I was shocked to see that it actually worked to remove the decades of rust from the surface, leaving it as brilliant as a mirror. Seeing those funky Jetsons-esque cans glimmer in the daylight made me re-think the whole "get it done now and make it pretty later" attitude of this project so far. Also the girls picked out some great colors for a new paint job and it would just be easier to do a good job of that with the parts all…apart.
I'll give it a week to decide.
Friday, June 8, 2007
Electricity
We're going camping this weekend so I know I won't be spending any time with the bike; I figure this is a good time to get the journal caught up even though I don't have any pictures to post right now.
Last week just by chance I picked up a battery, they were on sale and I figured I'd need one eventually (although I was going to hold off until the bike was closer to running, just so I didn't have to let the battery sit any longer than necessary). Although I was going to tackle the carbs next, maybe I'll change directions and take a look at the electrical/ignition systems.
After giving the battery a night to charge (they say it comes charged but that a "topping-up" is a good idea) I dropped it into the bike. The trickiest part of this is routing the overflow hose, which is why some people don't do it. I've been on the receiving end of bikes where the previous owner didn't think the hose was important and I can say that it's not pretty, especially because often the bikes charging system is located downstream from the battery vent. But anyway…
Once it was in and the terminals fastened down I had to at least try turning things on. After figuring out the three positions of the ignition I was able to verify that at least the base electrical system worked (headlight turns on, neutral light goes green, horn works). The exceptions here were the turn signals (which would turn on but not blink) and the brake light (which worked for the rear brake but not the front). The turn signals, I know there is a "flasher" device that I would guess in a bike this old is mechanical, so I need to figure out where that thing is and see if it's stuck or something. The front brake light problem is probably going to be more trouble, but for now I'm not going to sweat it.
I did give the electric starter a push, just to see what would happen and it made some sounds. There were sounds of the engine actually turning over, and there was an occasional sound best described as "a fork in a garbage disposal" that used to emanate from my 1976 Yamaha XS650 electric starter. I'll leave this alone for now.
Next I wanted to check out the ignition to complete my testing of the "essential" electrical systems. I first tried the old trick of pulling a plug and grounding it against the head to see if it would spark when I turned the engine over; no dice. I checked over the connections, the spark wires, the coils, etc. and everything looked good so I figured either there was something wrong with my test or there was something major wrong with the ignition system. I had even peeked at the points a few days back and they looked almost new.
A few days later I received the service manual that I had procured from Ebay and it described another ignition test that bypasses the spark plug. You pull what I would call the "boot" of the plug wire (the part that goes over the sparkplug) off and then try to get a spark from the wire inside the plug wire to the head. Bingo.
Bad plugs, duh.
So it looks like we have spark, now all we need is fuel. I had gone through the carbs somewhat maybe a week or so ago and decided they looked good enough to try, so the last thing I did during this session is start to hang them back on the bike. I got as far as the right-side carb and ran out of time, so the rest of this discussion will have to take place after the big camping weekend.
I'm also looking for a cheap digital camera that I can get dirty to make keeping this journal easier. I've decided on the Vista Quest VQ1005, but I'm having a hell of a time finding one locally. If you know of a store that carries these, pass that info along.
Friday, May 25, 2007
Ebay
I think Ebay is the number one reason owning a motorcycle like this is possible. When I say "a motorcycle like this" what I mean is owning a bike that is old enough to qualify for "classic" plates without spending more money on getting it running than you would pay to buy a similar new bike.
For example…
When I was a teenager my first bike was a 1976 Yamaha XS650 (the "Custom", I believe). I bought the bike for $125.00 from an ad in the Janesville Gazette. The bike was drivable and I was able to ride it home that day. When I got there I started going over the bike to see what needed to be done. All the typical items (tires, battery, etc.) looked like they would need replacement but in addition there were a few things I didn't expect as well. In particular, the lever for the choke was missing.
Now this is a tiny piece of metal with a little bit of a rubber/plastic handle on it and a mounting screw. Based on this I figured it would cost about $5.00 at most so I called up the local parts shop to have them order it. You can imagine my surprise when the total came to about $40.00.
That's just crazy!
As it turned out, this was just the beginning of the pain as the bike would later need a new airbox, rectifier and other various items which had they been ordered directly from the parts place would have easily put the cost of the bike over the $1000.00 mark, and that's before replacing the tires and the battery.
Needless to say buying these parts just wasn't in the cards on my Musicland salary and I had to improvise, leading to additional "learning experiences" down the road; but I digress.
Had Ebay existed back then, things might have been different.
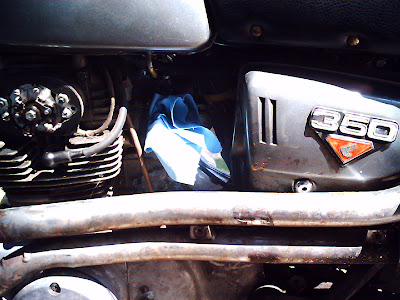
The bike I'm working on now, my CL350, came with a few "questionable" or just plain broken parts as well. I noticed that in addition to the rust the exhaust system has suffered there was also a bracket that was just plain broken. It might be possible for me to fabricate a replacement but it just so happens that I was able to find a NOS (New old-stock) piece on Ebay for about $5.00 (yes I see the irony in the pricing). The stator cover was also damaged at some point (from the looks of it, pierced by the shift lever when the bike went down on the left side). The cover has been repaired with what appears to be JB Weld, but since I was able to find a replacement one for $6.00 on Ebay I picked it up, I'll keep the original as a spare.
 I was also able to find a NOS shift lever (the one I have is still a bit crooked and missing the rubber bits) but at $15.00 it's just a little more than the part is worth to me, at least for now. I'll wait until a better bit comes along.
I'm sure that Ebay is just as much a boon to those selling these items as it is to people like me buying them. Now that box of parts in their garage can be turned into cash for other projects, and I know I feel better about contributing to that than the insane markup of a parts dealer.
For example…
When I was a teenager my first bike was a 1976 Yamaha XS650 (the "Custom", I believe). I bought the bike for $125.00 from an ad in the Janesville Gazette. The bike was drivable and I was able to ride it home that day. When I got there I started going over the bike to see what needed to be done. All the typical items (tires, battery, etc.) looked like they would need replacement but in addition there were a few things I didn't expect as well. In particular, the lever for the choke was missing.
Now this is a tiny piece of metal with a little bit of a rubber/plastic handle on it and a mounting screw. Based on this I figured it would cost about $5.00 at most so I called up the local parts shop to have them order it. You can imagine my surprise when the total came to about $40.00.
That's just crazy!
As it turned out, this was just the beginning of the pain as the bike would later need a new airbox, rectifier and other various items which had they been ordered directly from the parts place would have easily put the cost of the bike over the $1000.00 mark, and that's before replacing the tires and the battery.
Needless to say buying these parts just wasn't in the cards on my Musicland salary and I had to improvise, leading to additional "learning experiences" down the road; but I digress.
Had Ebay existed back then, things might have been different.
The bike I'm working on now, my CL350, came with a few "questionable" or just plain broken parts as well. I noticed that in addition to the rust the exhaust system has suffered there was also a bracket that was just plain broken. It might be possible for me to fabricate a replacement but it just so happens that I was able to find a NOS (New old-stock) piece on Ebay for about $5.00 (yes I see the irony in the pricing). The stator cover was also damaged at some point (from the looks of it, pierced by the shift lever when the bike went down on the left side). The cover has been repaired with what appears to be JB Weld, but since I was able to find a replacement one for $6.00 on Ebay I picked it up, I'll keep the original as a spare.
I was also able to find a NOS shift lever (the one I have is still a bit crooked and missing the rubber bits) but at $15.00 it's just a little more than the part is worth to me, at least for now. I'll wait until a better bit comes along.I'm sure that Ebay is just as much a boon to those selling these items as it is to people like me buying them. Now that box of parts in their garage can be turned into cash for other projects, and I know I feel better about contributing to that than the insane markup of a parts dealer.
Wednesday, May 23, 2007
Step 2: Hanging the pipes
 Tonight the girls and I decided to get started.
Let me just start out by saying that this bike has the most unusual exhaust plumbing I've ever seen. We spent at least 15 minutes just trying to decide which pipe went where and the assembly order of the exhaust clamps (I'm still not sure it's right).
The mufflers are quite rusted out (you can see the red remains of the lower muffler in a pile near the rear wheel) so my original plan was to remove them for now and replace them with baffles. However now that I've actually spent some time with them I find out that one is clamped on, the other welded. So, I won't be making any changes here until I get out the angle grinder...
 With a little help we were able to figure it out though and I even had enough time afterward to do an oil change (maybe for the first time in the last 15 years?). With some fresh lube in the case I felt more comfortable turning over the engine and I was able to do so without any unusual noises.
I also picked up a few feet of fuel line today. The next task will be to re-attach the carburetors (I inspected them today and they look surprisingly good) and hook them up to an external fuel supply (I have other plans for the actual gas tank, but I'll leave that for another post) so we can move closer to that first attempt at firing up the beast.
...now I need to go googling to make sure I clamped the headers on correctly...
Tuesday, May 22, 2007
The Price
In 1995 I declared that you can own a motorcycle for $1000.00. This was in response that I gave anyone who was interested in getting started in motorcycling but thought it was too expensive based on the going rate of new motorcycles at the time.
The principle is this: If you spent $1000.00 on a used bike you could find one that ran and was in good enough shape to ride at least for one season. If you spent $500.00 on a used bike, you'd probably need to put another $500.00 into it (typically battery, tires, etc.) to get it ready for serious riding. The same goes for $250.00/$750.00, $0.00/$1000.00, etc.
I think this general rule still holds true today, although I might bump the base cost to something like $1200.00.
I've started Google Spreadsheet (still trying to figure out how to share it with the general public) to track the cost of my little project here to see if this theory still holds true in the year 2007.
Step 1: Decide where to start
As I said before, one of the hardest parts of a project like this is deciding where to start. After spending the last two days going back and forth between two extremes (a complete frame-up restoration or a quick-and-dirty reassembly) I've decided to go with the latter.

The biggest reason for this is that my primary goal (to get the bike running in time for the fall Crud Run) is unlikely to happen if I completely overhaul the bike at this point. It's definitely something I'd like to do (and maybe I'll end up doing it anyway) but for now I'm just going to focus on getting the bike running and ridable and troubleshoot specific problems as they arise.
So, when I picked up the bike it came with a stock-pot full of parts in addition to the exhaust, fuel tank, seat and sissy bar separate from the rest of the motorcycle. This pot was filled with various fasteners, clamps and washers as well as the carburetors.

I think I'm going to begin the re-assembly with the exhaust if only because it's the area that's going to need the least attention. The fuel system needs to be re-attached as well but since the carbs are already detached I'm going to pull the bowls off just to make sure everything is clean before I bolt them back on. I'll also be replacing all the fuel plumbing as well as treating the tank (I haven't looked yet but I assume it's rusty on the inside), so hanging the pipes will probably be the easiest thing to do first.
The biggest reason for this is that my primary goal (to get the bike running in time for the fall Crud Run) is unlikely to happen if I completely overhaul the bike at this point. It's definitely something I'd like to do (and maybe I'll end up doing it anyway) but for now I'm just going to focus on getting the bike running and ridable and troubleshoot specific problems as they arise.
So, when I picked up the bike it came with a stock-pot full of parts in addition to the exhaust, fuel tank, seat and sissy bar separate from the rest of the motorcycle. This pot was filled with various fasteners, clamps and washers as well as the carburetors.
I think I'm going to begin the re-assembly with the exhaust if only because it's the area that's going to need the least attention. The fuel system needs to be re-attached as well but since the carbs are already detached I'm going to pull the bowls off just to make sure everything is clean before I bolt them back on. I'll also be replacing all the fuel plumbing as well as treating the tank (I haven't looked yet but I assume it's rusty on the inside), so hanging the pipes will probably be the easiest thing to do first.
Saturday, May 19, 2007
Bringing the bike home
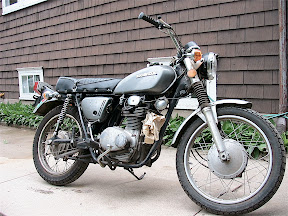
 This journal is about the bike I plan to ride in the fall 2007 Crud Run. Given to my by the father of a friend, this Honda CL350 is a beautiful example of engineering and design prevalent in 1970's Japanese motorcycles. Today Jacy and I picked up the bike from his parents house and trucked it back to my house in Beaver Dam.
This bike hasn't run for years, I'd guess at least 10 years if not more. At one point Jacy began to get it back in shape (which you can see as the carburetors and exhaust have been removed) so when I picked up the bike it came with a nice kettle of parts to go along with it. Not quite a true "basket case", but a good beginning nonetheless.
 I'm still evaluating the bike and deciding where to start. With a project like this, there's almost no "wrong" place to go to work first but if you spend some time thinking about it you can save yourself some trouble down the road by avoiding "re-work". Since the exhaust seems to be in the worst shape (the mufflers in particular, the headers don't look too bad...yet) one of the first things I'll need to do is look into tracking down replacements or alternatives and do some cost comparisons to see what makes the most sense.
Since my goal here is to ride the bike in the fall 'run, I'm willing to compromise when it comes to restoring the bike to "stock". Ideally I'd like to keep the bike as original as possible, to preserve its charm but I don't expect to have a numbers-matching museum piece when I'm done.
Another obvious area is the fuel system, first off because one of the most common dangers of an old bike like this is rust in the tank but also because most of the fuel system components have already been removed which is half the work. With a bike that has sat as long as this one you can pretty much count on having to replace any rubber components so items like the fuel lines, etc. are something you should start shopping for immediately.
Inital Entry
"The Crud Run Diaries" is a film currently in production that will feature a history of the (in)famous "Slimy Crud Run" motorcycle rally as well as the stories of two motorcyclists attempting to restore vintage Honda motorcycles in time to make the fall run.
I am Jason; this is my story.
I am Jason; this is my story.
Subscribe to:
Posts (Atom)
