Post-production is coming along nicely and this project's pace is really starting to pick up. To make it easier for everyone to keep on top of things, we've decided to consolidate our updates and make them available via the following methods:
We've also updated the projects Official Website to reflect the current "shape" of the film and set a date for the first public screening as well.
Matt will be making a whirlwind appearance at the fall 'Run, if you see him be sure to say hi!
Showing posts with label Progress. Show all posts
Showing posts with label Progress. Show all posts
Tuesday, September 29, 2009


Tuesday, August 4, 2009
Baby Steps
Another step in the right direction (?), the previous owner of "This Old Honda" got a letter from the DMV requesting some sort of "Bond". I'm not sure what that's all about, but Dan said he did, so I guess that's progress?
Anyway, some good news; the film is coming along fine. We're deep in post and planning on shooting some "supplementary" footage in a couple of weeks that should wrap up just about all of the loose ends we have on the photography front. I've also been working on the score with our "court composer" Derek Schyvinck and we seem to be on the same wavelength.
I'm hoping we will have a "teaser" available in the next month or so to share, but our focus at the moment is solidly on getting all remaining footage in the can so we can focus on the edit. That said, we could all use something to "point at" when we're discussing the film and I'm sure Matt could use a break from cutting interview footage.
In the meantime, go riding, it's beautiful out there!
Anyway, some good news; the film is coming along fine. We're deep in post and planning on shooting some "supplementary" footage in a couple of weeks that should wrap up just about all of the loose ends we have on the photography front. I've also been working on the score with our "court composer" Derek Schyvinck and we seem to be on the same wavelength.
I'm hoping we will have a "teaser" available in the next month or so to share, but our focus at the moment is solidly on getting all remaining footage in the can so we can focus on the edit. That said, we could all use something to "point at" when we're discussing the film and I'm sure Matt could use a break from cutting interview footage.
In the meantime, go riding, it's beautiful out there!
Monday, June 29, 2009
Some encouraging news...
I got an email over the weekend from the bike's previous owner. He has all the paperwork done and in the mail to get the title squared away. I'm not sure what this means time-wise, but at long last it looks like I'll have a clear title for the bike, which means I need to get my "rear in gear" and get these carb issues under control.
Friday, April 10, 2009
Crabby Carbs

So the replacement gasket came and I was able to install it using my new tools in record time. I pulled the battery off the charger, turned on the petcock and gave the bike a few mighty kicks. After more than I expected, it popped, sputtered and died.
This lead to maybe an hour of pulling plugs, checking for spark, trying individual cylinders, etc. Describing the process is boring, but the results are that now the right-hand side (the one I just replaced the gasket on) is working well, and the left-hand-side is acting up.

This is frustrating because last time, it was the other way around, and I haven't made any changes on the left-hand side!
Something else interesting, the right-hand-side (which has a new gasket) is now slowly leaking fuel via the bowl's overflow tube…I'm not sure what causes this, but I'm guessing it's a float or maybe a needle/slide thing?

Needless to say this was not the results I was expecting to have after this session. After giving it some time to simmer in the back of my mind, I have a few troubleshooting ideas for the upcoming weekend, and hopefully I can get it all sorted out soon.
Only three weeks to go...
Monday, March 23, 2009
Through the looking glass

Matt and I finally got around to shooting our next round of "project bike" interviews and it was interesting to be on the other side of the lens for a change. I have a renewed respect for everyone who put up with the hot lights and our countless questions.
Last weekend I got some feedback from one of our readers as well as about an hour to wrench on the bike and the results were promising. I bit the bullet and dropped one of the pipes, making it much easier to get the bowls back on the carbs.
As Chris pointed out, the enlarged gaskets will return to normal size on their own if you just give them a chance. I wish I would have known that before I re-sized the right-hand-carb's gasket.
So after about 20 minutes I had everything back together and turned on the fuel. As expected, the carb who's gasket I "adjusted" leaked, but after a bit of kicking I was able to get the bike to fire. It wouldn't idle however, so I experimented with figuring out if it was one side or the other that was acting up by removing one spark plug wire, then the other. Again no surprises, the right-side was acting up (the same side as the leaky carb) and it was doing what I can only explain as "surging slowly".
I thought about playing with the carb adjustments but I figured even if I was able to get it to behave it would just be screwed up again when I replace the gasket (I'm only guessing that the leak and the weird behavior are related because they came along at the same time, and the non-leaking side is working correctly). So for now I'm going to let it be, track down a new gasket and focus my efforts elsewhere.
Elsewhere being the rear brake.
I described the brake problem to Bill at Motorcycle Performance and he knew instantly what I was talking about. He told me all that I needed to do was loosen the rear axle nut, apply the brake and re-tighten. I'll be giving that a shot this week and hopefully I can check that item off the list.
With any luck I'll track down a gasket shortly and figure out if my midrange problem is resolved or if further investigation will be in order. For now I have something to work on (as well as making the bike street legal) so I'll focus on that.
On the film front we are closing in on our first rough cut (with placeholders for the footage that has yet to be shot, of course) which is very exciting. This will be the first time we've seen the footage assembled and having shot it over more than a year, there is footage that I haven't seen for a very long time in there. Hopefully we'll have something from that effort to share as well, but for now we're focused on making it to the spring run, which means back to the garage for me.
Wednesday, March 18, 2009
Bennie
I picked up a new battery from Fleet Farm, the same as the old one, just not fried. Added the acid, threw it on the charger and headed to the gas station for some fresh fuel.
I thought I'd be draining the "over winter" gas from the fuel tank but when I popped the gas cap, the tank was dry. I had noticed some leaking over the winter, but I had no idea how severe it was. I'm not sure where or why it leaked, because all last summer it held fuel (once it was treated) but when I topped it up in the fall, it somehow got back out.
Something to keep an eye on; anyway…
I dropped the freshly charged battery in the bike and tested the lights: all systems go. Poured in maybe a gallon or so of Premium (I thought I'd leave Ethanol out of the equation, for now) and after about five kicks, she started right up and settled down into a nice idle.
Unexpected, but nice.
The idea here was to make sure the thing would start as-is before I started messing with the jets. I didn't want to swap them out and have trouble getting it to run and be left wondering if something else had happened during the off-season or if it was just the recent changes. Now I know that if it doesn't work, it's my fault.
So I shut 'er down and inspect the bike as the engine cools. Everything looks good, surprisingly, although the top-end sounded a little lubrication-starved to me (not sure if this is normal or not for this bike, but something to check up on).
My plan is just to drop the bowls and swap the jets for the largest ones that came in my "kit". I figure since I more or less removed the exhaust system and opened up the intake as well I should start large and work my way down. The logic, hopefully not flawed, is that the side-effects of too rich a mixture (smoke and wet plugs) are better than that of too lean (overheating, detonation, etc.).
Unfortunately it wasn't going to be as simple as I would have liked to get these bowls off. First off, the right-side was too tight for any screwdrivers I had on hand, so I had to run to Fleet to pick up some stubbies and a pair of offset drivers (which are pretty cool). This was enough to get the bowl off, which led to the next problem.
When the bowl came off, the (new) gasket jumped out and somehow was too large to fit as-is back into the groove on the bowl. After trying in vain to get it back in there I decided to "shorten" it. I'm pretty sure I'm going to regret this, but since the only recourse was buying a smaller one, I figured there was no harm in trying it. Even after shortening it, it was impossible to get it to stay in the groove (if anyone has any tips for this, please pass them on, I'm going to be doing this a few more times). After messing with it for awhile I was able to get the bowl back on with the gasket in place and I think it's in the right place…
The left side was worse.
High pipes, while cool looking are not very practical. In this case, the top one made it almost impossible to get at the carburetor bowl with the carb mounted on the engine. Dropping the pipes would help, but since jet selection (for me) is a trial-and-error process, I really want to avoid having to do this each time I want to try different jets. After about thirty minutes I was able to get the bowl out and drop in the new jets.
The same gasket problems exist here (how did these things grow?) and are only compounded by the inaccessibility of the left carb. After another thirty minutes it was starting to get dark so I decided to call it for the night.
Thinking it over later, I should have just dropped the pipes. It would have only taken a few minutes, and I may have even gotten everything back together before dark. The worst part was that I knew this at the time, but I was too focused on trying out the new jets that I didn't take the time necessary to do it right.
At least I know what to do next time…
(sorry for the blandness of this post, I was in too much of a hurry to take pictures. Lucky for you, I'll be doing this again and I'll try to snap a few next time.)
I thought I'd be draining the "over winter" gas from the fuel tank but when I popped the gas cap, the tank was dry. I had noticed some leaking over the winter, but I had no idea how severe it was. I'm not sure where or why it leaked, because all last summer it held fuel (once it was treated) but when I topped it up in the fall, it somehow got back out.
Something to keep an eye on; anyway…
I dropped the freshly charged battery in the bike and tested the lights: all systems go. Poured in maybe a gallon or so of Premium (I thought I'd leave Ethanol out of the equation, for now) and after about five kicks, she started right up and settled down into a nice idle.
Unexpected, but nice.
The idea here was to make sure the thing would start as-is before I started messing with the jets. I didn't want to swap them out and have trouble getting it to run and be left wondering if something else had happened during the off-season or if it was just the recent changes. Now I know that if it doesn't work, it's my fault.
So I shut 'er down and inspect the bike as the engine cools. Everything looks good, surprisingly, although the top-end sounded a little lubrication-starved to me (not sure if this is normal or not for this bike, but something to check up on).
My plan is just to drop the bowls and swap the jets for the largest ones that came in my "kit". I figure since I more or less removed the exhaust system and opened up the intake as well I should start large and work my way down. The logic, hopefully not flawed, is that the side-effects of too rich a mixture (smoke and wet plugs) are better than that of too lean (overheating, detonation, etc.).
Unfortunately it wasn't going to be as simple as I would have liked to get these bowls off. First off, the right-side was too tight for any screwdrivers I had on hand, so I had to run to Fleet to pick up some stubbies and a pair of offset drivers (which are pretty cool). This was enough to get the bowl off, which led to the next problem.
When the bowl came off, the (new) gasket jumped out and somehow was too large to fit as-is back into the groove on the bowl. After trying in vain to get it back in there I decided to "shorten" it. I'm pretty sure I'm going to regret this, but since the only recourse was buying a smaller one, I figured there was no harm in trying it. Even after shortening it, it was impossible to get it to stay in the groove (if anyone has any tips for this, please pass them on, I'm going to be doing this a few more times). After messing with it for awhile I was able to get the bowl back on with the gasket in place and I think it's in the right place…
The left side was worse.
High pipes, while cool looking are not very practical. In this case, the top one made it almost impossible to get at the carburetor bowl with the carb mounted on the engine. Dropping the pipes would help, but since jet selection (for me) is a trial-and-error process, I really want to avoid having to do this each time I want to try different jets. After about thirty minutes I was able to get the bowl out and drop in the new jets.
The same gasket problems exist here (how did these things grow?) and are only compounded by the inaccessibility of the left carb. After another thirty minutes it was starting to get dark so I decided to call it for the night.
Thinking it over later, I should have just dropped the pipes. It would have only taken a few minutes, and I may have even gotten everything back together before dark. The worst part was that I knew this at the time, but I was too focused on trying out the new jets that I didn't take the time necessary to do it right.
At least I know what to do next time…
(sorry for the blandness of this post, I was in too much of a hurry to take pictures. Lucky for you, I'll be doing this again and I'll try to snap a few next time.)
Tuesday, February 3, 2009
Ike
It's hard to think about motorcycles when it's -5 degrees Fahrenheit, but I'll try.
Matt and I have been busy capturing/logging footage and taking a step back to look at what we have so far and how that fits into the "picture" of the film we started out with. Some things have come out exactly as we expected and others have exceeded our expectations in many ways.
There are two ways to approach a non-fiction film, you can set out to tell the story a certain way from the start and "force" this story in the way that you acquire footage and information or you can pick a "starting point" and let the film take shape as you gather media and information. I think that you have to have the whole story in mind when you start out, because you need to be able to envision the end of the film, but conversely I think you need to be able to let this go if, along the way, the story reveals itself in a way that is contradictory to your original vision. Ike said it best;
"In preparing for battle I have always found that plans are useless, but planning is indispensable."
Matt and I had a very solid vision of the film when we first started shooting in 2007, but since then so much has changed. When we started we could scarcely imagine the resources that we would be able to gather and today we stand here with such a rich collection of stories and images that to force them into the mold we originally set would be to sacrifice too much. So we have spent the last few months taking all this in and contemplating how to grow the idea of the film, in light of all that has changed, and we've come up with something that we are very excited about and we think you will be too.
…of course I can't spill the beans here, you weren't expecting that were you?
All grand plans aside there are some very basic and concrete tasks remaining before we can consider production "a wrap". Next on the agenda are interview sessions with yours truly and Matthew to gather updates on the project bikes, and speaking of project bikes there is the small matter of readying them for the spring run! At the moment the biggest obstacle for Matt is the self-draining fuel tank and for myself, aside from a few (what I consider minor) mechanical issues is the greater matter of getting the bike registered and street-legal.
So my next post will return to a discussion of these technical/mechanical items, but I wanted to take a moment to update you all on the status of the film itself. We are very excited to reveal more, and in the coming months we'll be leaking more details. Stay tuned.
BTW, for those of you who missed it on television you can see Matt and I on Wisconsin Public Television's "Directors Cut" online and catch a brief "sneak peek" of some of our Crud Run footage near the end of the episode: http://www.wpt.org/directorscut/111gullickson_cribben.cfm
Matt and I have been busy capturing/logging footage and taking a step back to look at what we have so far and how that fits into the "picture" of the film we started out with. Some things have come out exactly as we expected and others have exceeded our expectations in many ways.
There are two ways to approach a non-fiction film, you can set out to tell the story a certain way from the start and "force" this story in the way that you acquire footage and information or you can pick a "starting point" and let the film take shape as you gather media and information. I think that you have to have the whole story in mind when you start out, because you need to be able to envision the end of the film, but conversely I think you need to be able to let this go if, along the way, the story reveals itself in a way that is contradictory to your original vision. Ike said it best;
"In preparing for battle I have always found that plans are useless, but planning is indispensable."
Matt and I had a very solid vision of the film when we first started shooting in 2007, but since then so much has changed. When we started we could scarcely imagine the resources that we would be able to gather and today we stand here with such a rich collection of stories and images that to force them into the mold we originally set would be to sacrifice too much. So we have spent the last few months taking all this in and contemplating how to grow the idea of the film, in light of all that has changed, and we've come up with something that we are very excited about and we think you will be too.
…of course I can't spill the beans here, you weren't expecting that were you?
All grand plans aside there are some very basic and concrete tasks remaining before we can consider production "a wrap". Next on the agenda are interview sessions with yours truly and Matthew to gather updates on the project bikes, and speaking of project bikes there is the small matter of readying them for the spring run! At the moment the biggest obstacle for Matt is the self-draining fuel tank and for myself, aside from a few (what I consider minor) mechanical issues is the greater matter of getting the bike registered and street-legal.
So my next post will return to a discussion of these technical/mechanical items, but I wanted to take a moment to update you all on the status of the film itself. We are very excited to reveal more, and in the coming months we'll be leaking more details. Stay tuned.
BTW, for those of you who missed it on television you can see Matt and I on Wisconsin Public Television's "Directors Cut" online and catch a brief "sneak peek" of some of our Crud Run footage near the end of the episode: http://www.wpt.org/directorscut/111gullickson_cribben.cfm
Friday, September 26, 2008
Nine Days
I took the bike out for an extended ride last night (on a closed course of course…) and even was able to get a high-speed (60mph) run in there. There seems to be some sort of missing/backfiring problem between 0-.25 throttle which got worse toward the end of the ride. At first I thought it was maybe the battery conking out but I checked it right away when I got home and it was 12.25 (which is impressive since it was 11 something when I left...the charging system is working!). It also resembled a lack of fuel, but I think there was plenty in the tank and in the lines as well.
I need to do some reading but it might be that the air screws are too tight, making for a too-rich mixture around the crossover point where the carbs switch from the idle to the main jets (and both are open), so it might be just a matter of adjusting those screws, but you would think it would backfire at idle if that was all there is to it.
In any event the bike went 60 without ejecting any parts, and then it stopped as well. I have to say the handling is awesome (not that I pushed it too hard, but it feels really good at speed). If I can get this one running problem cleared up, and find out what's up with that back brake…I think she's done for this phase.
I need to do some reading but it might be that the air screws are too tight, making for a too-rich mixture around the crossover point where the carbs switch from the idle to the main jets (and both are open), so it might be just a matter of adjusting those screws, but you would think it would backfire at idle if that was all there is to it.
In any event the bike went 60 without ejecting any parts, and then it stopped as well. I have to say the handling is awesome (not that I pushed it too hard, but it feels really good at speed). If I can get this one running problem cleared up, and find out what's up with that back brake…I think she's done for this phase.
Tuesday, September 23, 2008
Twelve Days
The idle issue was solved today with some timing adjustments and cleaning of the mechanical advance mechanism.
The fuel leak has been located and can safely be ignored*.
The remaining issues are a minor missing/backfiring issue at 1/4 throttle-ish and the back brake has this "grabby" thing going on (who uses back brakes?). I have almost two miles on the bike now, all of them up-and-down the street in front of my house (much to the joy of my neighbors, I'm sure).
The thing is loud, almost painfully so. I'm open to (cheap, fast and easy) suggestions but chances are that I won't bother with it until after the run.
At this point I think I'm done until the bike can be on the street legally. I need to do a longer road test to figure out if the jetting is where it needs to be but I'm chicken to do it until I have a plate on the back. It would be a different story if I lived in the country...
*for the time being, it only leaks when the petcock is open and the bike isn't running.
The fuel leak has been located and can safely be ignored*.
The remaining issues are a minor missing/backfiring issue at 1/4 throttle-ish and the back brake has this "grabby" thing going on (who uses back brakes?). I have almost two miles on the bike now, all of them up-and-down the street in front of my house (much to the joy of my neighbors, I'm sure).
The thing is loud, almost painfully so. I'm open to (cheap, fast and easy) suggestions but chances are that I won't bother with it until after the run.
At this point I think I'm done until the bike can be on the street legally. I need to do a longer road test to figure out if the jetting is where it needs to be but I'm chicken to do it until I have a plate on the back. It would be a different story if I lived in the country...
*for the time being, it only leaks when the petcock is open and the bike isn't running.
Sunday, September 21, 2008
Two Weeks
Today is Sunday, and there are only two weeks remaining until the 2008 Fall SCMG Cafe Racer Run.
After all of the tyre excitement of the last few weeks I was able to get the wheels back and mount them up with few issues. There are several various-sized cotter pins that I need to track down to finalize the assembly, but for now I'll just keep an eye on things.
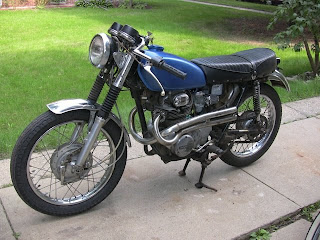
As you can see, Jamie has done a fantastic job on the part I fear the most (the fuel tank), especially considering what I have given her to work with. You can see that along the way she's taken the time to tweak all the bits that I would have done poorly (or forgotten altogether).
So with the wheels on and the paint set, today is the day that I re-engage the idle problem.
Those of you who have been following this story know that I was able to successfully awaken this beast, but there is a big difference between "starting" and "running", and after I started it a few times I felt comfortable that there were no major mechanical engine problems lurking below (ie, blown head, bent valves, broken con-rods, etc.) and felt safe to turn my attention to other tasks and return to the engine when the intake, exhaust and fuel system were in in their final configuration.
The time has come, so I plumbed the tank, snagged a fresh can of Invigorate and kicked it.
Surprisingly she responded with only a few kicks (unlike before). After two start-stops I was able to hold the engine around 3500rpm without sudden death, so I was already back to where I left off.
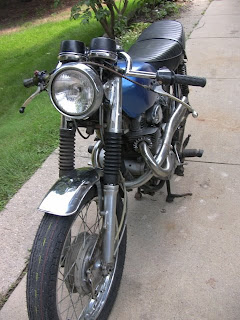
This time I decided to tackle the problem one cylinder at a time. First I pulled the left plug wire and was able to get the bike to run almost smoothly around 2000rpm. Moving to the left cylinder (removing the right plug wire) was a completely different story, a couple of pops but no hope of any kind of constant firing.
Starting with spark, I pulled the plug and noticed the little knob that screws on the top of the plug (I bought Champions for this thing? no way...) was loose so I noted this and continued to pull the plug. Examining the electrodes they were a little black and funky, but not bad, so I dressed them quickly, tightened that "know" and tested for spark; much stronger than I expected.
I fitted the plug to the cylinder and tested again, this time it fired at least as well as the right-hand side. I snapped the right-hand plug wire in place, reduced the throttle and it almost got down to 1500RPM before dropping off.
From here I spent at least 30 minutes screwing around with various air-screw settings, idle stops, etc until finally it was starting in just a kick or two with no throttle...
ah...satisfaction!

I was tempted to hop on and take it around the block but better judgement (and hunger, it was lunch time) prevailed and we headed in for a bite. This was in the end fortunate because during lunch I remembered a few adjustments that would be necessary (like adjusting the brakes) before a road test would be prudent.
After lunch I checked the tyre pressure (Haynes recommends 23psi?...old bikes are weird), adjusted the brakes and decided to do a test-run in the driveway to make sure I wasn't going to run into any clutch/transmission-related surprises on the street. This went well (note to self: the neutral light can't be trusted) so I grabbed my lid and...
...well, see for yourself (crank up the sound, it's worth it):
There is work to do, there is an idle problem where once the RPM's have been up, it doesn't want to drop back down to a normal idle (I found applying the choke for a moment fixes this?). There is also the problem of the title, but my man Dan is fighting that battle with the DMV, so we'll see how that turns out.
But for now, the only mechanical issue on my list is that idle problem...isn't that where this post started?
After all of the tyre excitement of the last few weeks I was able to get the wheels back and mount them up with few issues. There are several various-sized cotter pins that I need to track down to finalize the assembly, but for now I'll just keep an eye on things.

As you can see, Jamie has done a fantastic job on the part I fear the most (the fuel tank), especially considering what I have given her to work with. You can see that along the way she's taken the time to tweak all the bits that I would have done poorly (or forgotten altogether).
So with the wheels on and the paint set, today is the day that I re-engage the idle problem.
Those of you who have been following this story know that I was able to successfully awaken this beast, but there is a big difference between "starting" and "running", and after I started it a few times I felt comfortable that there were no major mechanical engine problems lurking below (ie, blown head, bent valves, broken con-rods, etc.) and felt safe to turn my attention to other tasks and return to the engine when the intake, exhaust and fuel system were in in their final configuration.
The time has come, so I plumbed the tank, snagged a fresh can of Invigorate and kicked it.
Surprisingly she responded with only a few kicks (unlike before). After two start-stops I was able to hold the engine around 3500rpm without sudden death, so I was already back to where I left off.

This time I decided to tackle the problem one cylinder at a time. First I pulled the left plug wire and was able to get the bike to run almost smoothly around 2000rpm. Moving to the left cylinder (removing the right plug wire) was a completely different story, a couple of pops but no hope of any kind of constant firing.
Starting with spark, I pulled the plug and noticed the little knob that screws on the top of the plug (I bought Champions for this thing? no way...) was loose so I noted this and continued to pull the plug. Examining the electrodes they were a little black and funky, but not bad, so I dressed them quickly, tightened that "know" and tested for spark; much stronger than I expected.
I fitted the plug to the cylinder and tested again, this time it fired at least as well as the right-hand side. I snapped the right-hand plug wire in place, reduced the throttle and it almost got down to 1500RPM before dropping off.
From here I spent at least 30 minutes screwing around with various air-screw settings, idle stops, etc until finally it was starting in just a kick or two with no throttle...
ah...satisfaction!

I was tempted to hop on and take it around the block but better judgement (and hunger, it was lunch time) prevailed and we headed in for a bite. This was in the end fortunate because during lunch I remembered a few adjustments that would be necessary (like adjusting the brakes) before a road test would be prudent.
After lunch I checked the tyre pressure (Haynes recommends 23psi?...old bikes are weird), adjusted the brakes and decided to do a test-run in the driveway to make sure I wasn't going to run into any clutch/transmission-related surprises on the street. This went well (note to self: the neutral light can't be trusted) so I grabbed my lid and...
...well, see for yourself (crank up the sound, it's worth it):
There is work to do, there is an idle problem where once the RPM's have been up, it doesn't want to drop back down to a normal idle (I found applying the choke for a moment fixes this?). There is also the problem of the title, but my man Dan is fighting that battle with the DMV, so we'll see how that turns out.
But for now, the only mechanical issue on my list is that idle problem...isn't that where this post started?
Tuesday, September 9, 2008
Measure twice, order once
Here's a bit of advice to all the budding "$1000.00 Motorcycle" mechanics out there: Anytime you order a part, make sure it will fit your bike by actually measuring the mating parts and don't go by what "should fit based on the model".
I'm not sure why, but I fell squarely into this trap myself.
I had to order a new set of tyres since the ones that came on the bike are of unknown age but definitely old. So I go to Madison Motorsports and we look up in the book what kind of tyres are available for a 197x CL350. As it turns out they are hard to get so I place an order and forget about the whole thing for a couple of weeks.
I get a call last week that the tyres are in, so I spend a few hours getting the wheels free from the bike and bring them down to the shop the next day.
Later that same day I get a call from the shop because there is a problem with the tyres I ordered. I ordered a set of 18" tyres as this is the size of the stock wheels on the 197x CL350, however when the guys at the shop tried to mount them they found out that my front wheel is not 18", it's 19".
This brought into question weather or not I had a CL350 at all (apparently the SL350 had a 19" wheel). I know it's a CL350 because that's what's stamped on the frame, but then it all becomes clear:
When I was stripping and re-painting the tank I found out that there was some bondo filling in a few dents, and there are other signs that the bike has been down. My guess is that when the bike went down the original 18" wheel got bent and was replaced with this 19" wheel. Maybe the whole front end was replaced?
Now let me say here that this is all my fault. Instead of going with "what the book says" I should have measured the wheels (hell, just read the numbers off the tyre) and this could have all been avoided. Based on this, the shop could have justifiably charged me for this tyre as well as another that actually fits, but they have been most understanding of the situation.
Fortunately they were able to source a 19" tyre from a nearby supplier and it's still possible that they will get it ready before they take off for the races at the end of the week. This could have been a show-stopper for the fall run, but it just goes to show the value of having a good relationship with a professional shop.
My old man was right...
I'm not sure why, but I fell squarely into this trap myself.
I had to order a new set of tyres since the ones that came on the bike are of unknown age but definitely old. So I go to Madison Motorsports and we look up in the book what kind of tyres are available for a 197x CL350. As it turns out they are hard to get so I place an order and forget about the whole thing for a couple of weeks.
I get a call last week that the tyres are in, so I spend a few hours getting the wheels free from the bike and bring them down to the shop the next day.
Later that same day I get a call from the shop because there is a problem with the tyres I ordered. I ordered a set of 18" tyres as this is the size of the stock wheels on the 197x CL350, however when the guys at the shop tried to mount them they found out that my front wheel is not 18", it's 19".
This brought into question weather or not I had a CL350 at all (apparently the SL350 had a 19" wheel). I know it's a CL350 because that's what's stamped on the frame, but then it all becomes clear:
When I was stripping and re-painting the tank I found out that there was some bondo filling in a few dents, and there are other signs that the bike has been down. My guess is that when the bike went down the original 18" wheel got bent and was replaced with this 19" wheel. Maybe the whole front end was replaced?
Now let me say here that this is all my fault. Instead of going with "what the book says" I should have measured the wheels (hell, just read the numbers off the tyre) and this could have all been avoided. Based on this, the shop could have justifiably charged me for this tyre as well as another that actually fits, but they have been most understanding of the situation.
Fortunately they were able to source a 19" tyre from a nearby supplier and it's still possible that they will get it ready before they take off for the races at the end of the week. This could have been a show-stopper for the fall run, but it just goes to show the value of having a good relationship with a professional shop.
My old man was right...
Sunday, September 7, 2008
Better?

...yes
After shooting an interview with Chris I had a couple of hours to spend on the old Honda. My tires came in last week and I need to get the wheels to the shop on Monday if I'm going to get them back anytime soon. Seems that the shop will be closed starting Thursday to go to the races, and I can't fault them for that.
So I pulled the wheels and while time-consuming, everything went pretty well. The hardest part was jacking up the bike so it could sit on the center-stand w/o wheels (the engine cradle is interesting, it's not the same height on both sides. After about 30 minutes I had both wheels free and set them aside for a little scrubbing before I hand them over.
While doing this I was also applying another coat of primer to the tank. I picked up some sanding sponge which worked awesome on the first coat, but I was a little thin in a few spots so a second pass is necessary. This is a nice task to do when a break occurs in another, like pulling these wheels.
Back in the garage I turn my attention to the electrical problems I've been having and in particular, the brake light. Seems it would turn on with the ignition, but it wouldn't change when the brakes were applied, and every once in awhile I'd blow the fuse (there is only one), so something was up.

I picked up a nice little 15a circuit breaker so I could troubleshoot this without going through boxes of fuses (I also replaced the old-fashioned fuse holder with a new "blade" style fuse). The circuit breaker fit good enough, but for the street I'll have to use a real fuse so it fits in the holder better. I also picked up some "bullet" wiring connectors for the tail light so I can easily swap things around. I followed the wiring diagram but I had a feeling that maybe something wasn't connected up right.
...that feeling turned out to be correct.
After a few minutes with the multimeter, I was able to determine that what I thought was the ground was the switched lead to make the brake light brighter. Swapping these around, suddenly the brake light functioned properly (with the foot brake at least, the handle bar switch is another story) so I crimped on the bullet connectors and closed up the tail light.
Then I spent another 15 minutes or so crimping closed ends on all of the various non-connected wires I have after I removed the handle bar controls and turn signals. In the long run I'll be ripping all this out and re-wiring the bike but for now I'm just trying to close up possible shorts.

Back to the tank for another coat, and then back to the garage to clean up those wheels.
I don't have a shot of the wheels after spending some time working on them with the old Brillo, but the results are pretty amazing. If I get a chance I'll snap one before I hand them off but most likely the next time I'll have the camera out there will be when I'm re-mounting the wheels, fresh rubber and all.
Friday, August 22, 2008
Rebel Yell
I got to spend about 1.5hrs on the bike last night so I checked the Kreem in the tank (which was completely dry) and tested for leaks...no leaks. Then I tested the "balancing" tubes and one was clogged, but after about 10 minutes and piece of wire I was able to get a reasonable amount of fuel to flow out of it. I pulled the petcock (the old one) to see if there was any obstruction there and all of the fuel poured out, so that looked good.

I then moved to "tying up" what I could in the electrical system for an attempt at starting the thing later. Essentially I tied enough wires together to simulate the kill switch being in the "run" position and to put the headlight on "low". Through this process I noticed all sorts of weird behavior, sometimes the running light of the tail light would be on, other times it would be off but would activate when I applied the brake, but never both at the same time.

So, once the electricals were satisfactory I screwed in the new petcock and plumbed the tank. The fuel filters I got are too big for the fuel line I have so I left them out (the new petcock has a nice new strainer so I figured I was at least partially safe). I had a major hassle getting that balancing line connected (I think those tubes have a slightly larger outside diameter than the rest of the system, so I should get some bigger hose) and then it started to rain.
I didn't give up however and got the hose attached in the garage. The rain let up so I pulled the bike back out and took a shot at starting it. After about a dozen kicks it backfired (which greatly impressed Lib) and then after a few more it sprung to life. This time I had the sense to observe the tach and it seemed like I could bring the RPM's down to about 3000 but any lower and the thing dies.
Remembering that 3000 is about where the alternator starts making power, I decided to check the battery since below 3k the bike isn't generating enough power to throw a spark. Sure enough, just slightly more than 10 volts.
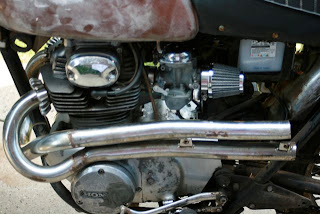
So I threw it on the charger last night thinking that if it ran at all with 10 volts maybe it would run great at 12-13, and even though that battery is smoked, it can usually hold a charge for an hour or so after it comes off the charger.
This morning I gave it another shot before coming in to the office and while it definitely starts easier and I can get the revs down closer to 2k, it still won't come close to idling, and when I try to hold the revs steady (around 3.5k), there is some "undulation".
So, I've got some research to do. I read somewhere that getting these bikes to idle w/o the stock exhaust is difficult, but I've seen many with modified pipes so that can't be the only cause. There are so many other possibilities but I'm going to try and narrow them down, otherwise I could spend a long time getting everything perfect.
But it was cool to hear it run again, and I think my tank nightmares are over, so I'm not complaining.
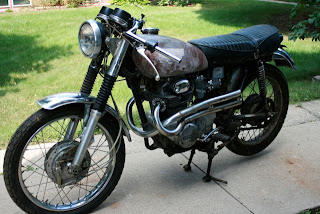

I then moved to "tying up" what I could in the electrical system for an attempt at starting the thing later. Essentially I tied enough wires together to simulate the kill switch being in the "run" position and to put the headlight on "low". Through this process I noticed all sorts of weird behavior, sometimes the running light of the tail light would be on, other times it would be off but would activate when I applied the brake, but never both at the same time.

So, once the electricals were satisfactory I screwed in the new petcock and plumbed the tank. The fuel filters I got are too big for the fuel line I have so I left them out (the new petcock has a nice new strainer so I figured I was at least partially safe). I had a major hassle getting that balancing line connected (I think those tubes have a slightly larger outside diameter than the rest of the system, so I should get some bigger hose) and then it started to rain.
I didn't give up however and got the hose attached in the garage. The rain let up so I pulled the bike back out and took a shot at starting it. After about a dozen kicks it backfired (which greatly impressed Lib) and then after a few more it sprung to life. This time I had the sense to observe the tach and it seemed like I could bring the RPM's down to about 3000 but any lower and the thing dies.
Remembering that 3000 is about where the alternator starts making power, I decided to check the battery since below 3k the bike isn't generating enough power to throw a spark. Sure enough, just slightly more than 10 volts.

So I threw it on the charger last night thinking that if it ran at all with 10 volts maybe it would run great at 12-13, and even though that battery is smoked, it can usually hold a charge for an hour or so after it comes off the charger.
This morning I gave it another shot before coming in to the office and while it definitely starts easier and I can get the revs down closer to 2k, it still won't come close to idling, and when I try to hold the revs steady (around 3.5k), there is some "undulation".
So, I've got some research to do. I read somewhere that getting these bikes to idle w/o the stock exhaust is difficult, but I've seen many with modified pipes so that can't be the only cause. There are so many other possibilities but I'm going to try and narrow them down, otherwise I could spend a long time getting everything perfect.
But it was cool to hear it run again, and I think my tank nightmares are over, so I'm not complaining.

Tuesday, August 12, 2008
Grinding Disraeli Gears, Part 2
Where was I...oh yes.
So the next day I checked the tank filled with the "A" solution and things looked pretty clean, so I got ready for the next step.
The instructions indicate that you need to get the "A" stuff out, add the "B" and then immediately add "C" once you emptied the "B" stuff out (as rust will set in immediately.
After yesterday's "B" before "A" debacle, I only have about half a bottle of the "B" solution, and even that is somewhat nasty and rusty, but since I don't have alot of choice (and I'm growing ever more comfortable with the idea of replacing the tank anyway), I'm just going to go for it and see what happens.
So I pour the "A" + water solution and add what's left of the "B" bottle. This smells horrible and I slosh it around as best as I can. Following the directions, I get the can of "C" ready to go and quickly pour it into the tank.
As I slosh the white good around in the tank I notice that it is a bit runny...and rusty colored...
Finding yet one more way to screw this up, I added the contents of the "C" can without first emptying the "B" solution from the tank...brilliant!
After coating the tank as much as I can I decide to move on to something completely different and here I can say things went much better.
You may remember the surprise I had when I tried to swap out the handlebars in a previous post? Today I was ready to go to town with the wire cutters and make the swap. After some careful cutting, re-routing of control cables and Dremel work, the new bars were in place (and looking pretty sweet, I might add).
The Kreeme had one more trick up its sleeve for me. The next day I wanted to see what the bike would look like with the tank on, and I tested it several times to see if the coating had set up. No matter what I did I couldn't get any more to drip out, so I popped the tank on the bike. No sooner than a second or two after I got to marvel at the progress the Kreem decided to flow again and emptied out of the tank and on to my nice clean carburators...
I'm glad this part is almost over.
So the next day I checked the tank filled with the "A" solution and things looked pretty clean, so I got ready for the next step.
The instructions indicate that you need to get the "A" stuff out, add the "B" and then immediately add "C" once you emptied the "B" stuff out (as rust will set in immediately.
After yesterday's "B" before "A" debacle, I only have about half a bottle of the "B" solution, and even that is somewhat nasty and rusty, but since I don't have alot of choice (and I'm growing ever more comfortable with the idea of replacing the tank anyway), I'm just going to go for it and see what happens.
So I pour the "A" + water solution and add what's left of the "B" bottle. This smells horrible and I slosh it around as best as I can. Following the directions, I get the can of "C" ready to go and quickly pour it into the tank.
As I slosh the white good around in the tank I notice that it is a bit runny...and rusty colored...
Finding yet one more way to screw this up, I added the contents of the "C" can without first emptying the "B" solution from the tank...brilliant!
After coating the tank as much as I can I decide to move on to something completely different and here I can say things went much better.

You may remember the surprise I had when I tried to swap out the handlebars in a previous post? Today I was ready to go to town with the wire cutters and make the swap. After some careful cutting, re-routing of control cables and Dremel work, the new bars were in place (and looking pretty sweet, I might add).

The Kreeme had one more trick up its sleeve for me. The next day I wanted to see what the bike would look like with the tank on, and I tested it several times to see if the coating had set up. No matter what I did I couldn't get any more to drip out, so I popped the tank on the bike. No sooner than a second or two after I got to marvel at the progress the Kreem decided to flow again and emptied out of the tank and on to my nice clean carburators...
I'm glad this part is almost over.
Monday, August 11, 2008
Grinding Disraeli Gears, Part 1
I’m going to start this post right away (although I might not post it right away) while the details are fresh in my mind.
For two weeks I tweaked on the process of restoring a rusty gas tank using the Kreem product. I read tutorials, watched videos and talked to people who have done this before but no matter what I had this bad feeling about the process.
Finally on Saturday I had some time to get started and since I had scheduled most of Sunday to work on the bike I thought it would be cool if I could get the preliminaries out of the way and get the Kreem in the tank and drying by Saturday night. The tank needs some work on the outside as well and the idea was to combine as much of this as possible since there is a lot of waiting involved.
The first part of the Kreem process is plugging the holes in the tank. I wasted a lot of time on this and in the end made probably the worst possible choices. I decided to leave the petcock in, since when I pulled it I found that it was barely functional and very rusted out. It’s going to need to at least be rebuilt (if not replaced) so I was comfortable with sacrificing it to the process.
The other two holes I was concerned with are two steel lines that come out of the bottom of the tank on either side. When the tank is on the bike, these two are connected with a piece of hose that runs through the frame so it has to be removed when the tank is off the bike. Here I came up with the brilliant idea of connecting these two with a short length of hose for the etching process and then using a length of wire in each to keep them open when applying the Kreem coating itself.
The Kreeme kit I got came with three containers labeld A, B and C. This should be simple enough, but for some reason I can’t explain I managed to dump bottle B in the tank first.
I told you I had a bad feeling about this.
I noticed this just as the bottle became empty and scrambled to recover as much of the (now rusty) liquid into its original container. After a scene that would make the three stooges proud, I got about 50% of it back.
I still can’t figure out how I screwed this up, I literally ran the steps through in my head a dozen times and read and re-read the directions over and over again. Amazing.
This time I add the right bottle, and then add additional hot water (as directed) and the tank is almost full. I let this mess sit for a few minutes and then, realizing that there isn’t much more I can do at this point turn my attention to the outside of the tank.
The plan here is to strip the paint, apply some bondo to cover the mounting plates for the emblems and then prime it for painting. Since the whole mess is nicely suspended on a 5-gallon pail I decide this is a good time to apply some paint stripper. This goes well and the paint begins to bubble up immediately (I use “Dad’s”, I haven’t used too many others but I prefer it to Zip Strip). After about 15 minutes most of the paint is falling off or close to it and a quick swipe with the putty knife removes almost all of it, revealing something interesting.
I’m not the first person to Bondo this tank.
On the front-left side of the tank is a patch of Bondo about four inches in diameter. On the opposite side is one about an inch around. I’ve know that the bike was down before I got it based on damage to the right-hand side of the engine, turn-signals, etc. but I didn’t know that the tank had been repaired. This was great news for me because it makes me more comfortable with screwing up the restoration of the tank, knowing that it’s not exactly in “new” condition.
Some steel wool and alcohol removes most of the paint and primer, enough for the Bondo to get a good grip (I think, I’ve never used it before) and so I give it a water rinse and let it dry. I take this chance to “agitate” the Kreem “A” stuff in the tank and when I take a peek it looks like it might actually be working.
I’m feeling more confident now so I decide to jump into the Bondo task once the tank is dry.
Bondo is cool stuff, I’ve never worked with it before and using nothing more that the directions on the can I had a very tenuous grip on the process but went at it anyway, with gusto. Other than getting too much of it on my Mechanix Gloves, it went well enough (I found out a little goes a long way). Using the included tool, I applied a fairly thin layer, just enough to cover up the mounting plates, to either side of the tank and let it dry. I applied a little more after the first layer seemed to set up so that there would be more of a “safety zone” when the time comes to sand this down.
Another agitation of the tank, it’s looking a little better now…
According to the directions they recommend 24 hours for an old tank, so that’s what I’m going to give it; I’ll leave B and C for Sunday…
For two weeks I tweaked on the process of restoring a rusty gas tank using the Kreem product. I read tutorials, watched videos and talked to people who have done this before but no matter what I had this bad feeling about the process.
Finally on Saturday I had some time to get started and since I had scheduled most of Sunday to work on the bike I thought it would be cool if I could get the preliminaries out of the way and get the Kreem in the tank and drying by Saturday night. The tank needs some work on the outside as well and the idea was to combine as much of this as possible since there is a lot of waiting involved.
The first part of the Kreem process is plugging the holes in the tank. I wasted a lot of time on this and in the end made probably the worst possible choices. I decided to leave the petcock in, since when I pulled it I found that it was barely functional and very rusted out. It’s going to need to at least be rebuilt (if not replaced) so I was comfortable with sacrificing it to the process.
The other two holes I was concerned with are two steel lines that come out of the bottom of the tank on either side. When the tank is on the bike, these two are connected with a piece of hose that runs through the frame so it has to be removed when the tank is off the bike. Here I came up with the brilliant idea of connecting these two with a short length of hose for the etching process and then using a length of wire in each to keep them open when applying the Kreem coating itself.
The Kreeme kit I got came with three containers labeld A, B and C. This should be simple enough, but for some reason I can’t explain I managed to dump bottle B in the tank first.
I told you I had a bad feeling about this.
I noticed this just as the bottle became empty and scrambled to recover as much of the (now rusty) liquid into its original container. After a scene that would make the three stooges proud, I got about 50% of it back.
I still can’t figure out how I screwed this up, I literally ran the steps through in my head a dozen times and read and re-read the directions over and over again. Amazing.
This time I add the right bottle, and then add additional hot water (as directed) and the tank is almost full. I let this mess sit for a few minutes and then, realizing that there isn’t much more I can do at this point turn my attention to the outside of the tank.
The plan here is to strip the paint, apply some bondo to cover the mounting plates for the emblems and then prime it for painting. Since the whole mess is nicely suspended on a 5-gallon pail I decide this is a good time to apply some paint stripper. This goes well and the paint begins to bubble up immediately (I use “Dad’s”, I haven’t used too many others but I prefer it to Zip Strip). After about 15 minutes most of the paint is falling off or close to it and a quick swipe with the putty knife removes almost all of it, revealing something interesting.
I’m not the first person to Bondo this tank.
On the front-left side of the tank is a patch of Bondo about four inches in diameter. On the opposite side is one about an inch around. I’ve know that the bike was down before I got it based on damage to the right-hand side of the engine, turn-signals, etc. but I didn’t know that the tank had been repaired. This was great news for me because it makes me more comfortable with screwing up the restoration of the tank, knowing that it’s not exactly in “new” condition.
Some steel wool and alcohol removes most of the paint and primer, enough for the Bondo to get a good grip (I think, I’ve never used it before) and so I give it a water rinse and let it dry. I take this chance to “agitate” the Kreem “A” stuff in the tank and when I take a peek it looks like it might actually be working.
I’m feeling more confident now so I decide to jump into the Bondo task once the tank is dry.
Bondo is cool stuff, I’ve never worked with it before and using nothing more that the directions on the can I had a very tenuous grip on the process but went at it anyway, with gusto. Other than getting too much of it on my Mechanix Gloves, it went well enough (I found out a little goes a long way). Using the included tool, I applied a fairly thin layer, just enough to cover up the mounting plates, to either side of the tank and let it dry. I applied a little more after the first layer seemed to set up so that there would be more of a “safety zone” when the time comes to sand this down.
Another agitation of the tank, it’s looking a little better now…
According to the directions they recommend 24 hours for an old tank, so that’s what I’m going to give it; I’ll leave B and C for Sunday…
Friday, August 1, 2008
Reserves Day 1
Last Sunday Matt came over with the camera and all told I spent a solid six hours working on the bike. In the morning I extracted it from my Tetris-like garage arrangement, setup an improve workbench and went through the day’s work in my head.
Before Matt arrived I started out with a few small adjustments to the recently overhauled carburetors. I thought there was a more thorough procedure outlined in my Clymer manual but most of the adjustment requires the bike to be running so that will have to wait.
Since we’re going with individual “pod”-style air filters one of the tasks on today’s agenda is removing the existing airbox. This was pretty straightforward once I realized that the two sides of the box are connected to each other using a rod that goes between the two sides. After bending the rod and denting one side of the airbox I realized this, removed the nut from one end and the whole thing fell away nicely. This really opened things up under the seat and there is now a lot more room to work with (which will make mounting the carbs a lot easier) but there are a few brackets and tabs and such that I think can go, later.
Since I needed some pipe clamps (on the list for the Fleet Farm run when Matt arrives) to mount the carbs I decided to move on to something easy like swapping out the handlebars. The CL come with these cool MX-style bars but I have a pair of even-cooler clubman bars I bought for my Monster years back but they didn’t fit.
I sliced the left grip to remove it and the pulled the screws from the left-side controls. For some reason, they didn’t just fall off at that point. I attributed this to decades of goo but after moving it around a bit I realized something more discouraging: all of the electrical for the hand controls are threaded through the handlebars.
I took a minute to contemplate what this meant and came to a few conclusions. The first was that it was very unlikely that the current wiring would be of the proper length for the new bars, so I’d be looking at extending it. If I’m going to extend it, I want to cut it back to a point where I could add a water-tight connector and hide it away, so that means back by the speedometer and tach. It also means I’ll need the connector itself, the wire, some way to “wrap up” the individual leads and I’ll be re-wiring the controls as well.
I was just about to cut the first wire when I realized that if I started this process now there was little-to-no chance the bike would run today. I didn’t have any great expectations that it would run anyway, but if I dove into this re-wiring effort (which required parts I didn’t have on hand) that there would be little chance of having everything in place to try and fire up the engine.
So instead I grabbed the Simple Green and started scrubbing until Matt arrived.
When Matt got there we grabbed a couple of cups of Black Gold and I went over the plan. We headed to Fleet to pick up a new battery, hose clamps, air filters and a fuel filter.
We returned with some hose clamps, a fuel filter (for a lawn tractor) and a battery charger (mine had burned up recently and I thought for $25 it would be worth a shot to try and revive the battery). I threw the battery on the charger and started the re-assembly with the carburetors. With the airbox removed this went quickly and easily and with the newly-cleaned carbs the throttle action was much improved (although I still need to at least lubricate the cable if not replace it at some point).
Once that was done I realized that I still had to hang the pipes and as I got started with that Matt grabbed the camera and started rolling. It had been awhile since I played with mounting the exhaust but after a few botched attempts I remembered how the two-piece flanges went on and the pipes were back on the bike.
Since they are considerably shorter than before the mounts that previously supported them no longer make sense, so for the moment they are simply bolted to the head. I imagine this isn’t a long-term solution.
With the carbs back on and the pipes hung, we were ready to drop in the battery, apply fuel and attempt to fire up the engine. I checked on my old battery and according to the charger it was almost done (one remaining bar on the 5-bar charge indicator). Thinking optimistically I pulled the battery off the charger and dropped it in the bike; there was almost no response. Realizing this was futile I pulled the battery and put it back on the charger, I had considered this possibility earlier in the week and had a plan B.
Matt and I both had the same thought as we eyed up my new bike, the Magna.
After learning the hard way how to get the battery out of the Magna we yanked it and set it up next to the CL. I found a pair of jumper cables in the garage and quickly attached them to the battery terminals of the bike, and then to the battery itself. I quick turn of the key indicated that the CL’s electrical system was not to blame for the previous batteries performance and the bike turned over without strain.
Next I dug out the Fuel IV previously mentioned on these pages and realized that the only gasoline I had on hand was from the last attempt at starting this bike, last summer. So, Matt and I headed to the corner gas station to buy about a half-gallon of gas and then headed back to the garage.
With the fuel lines connected I added a small amount of fuel to the IV and watched for leaks. Things looked pretty tight (before fuel would pour out of one of the bowls) so I turned the key, set the choke and hit the starter…
…nothing.
I was hoping that the reason we didn’t see a leak was not because there was no fuel flowing through the carbs. Let’s try again.
…nothing.
Maybe it doesn’t need the choke?
…nothing
The last time I turned the bike over I tested the ignition and there was spark, but that was months ago so we verified this the old fashioned way. Spark on both sides, but the plugs seem dry. I added more fuel to the IV (it was now started to drip from one of the bowl drains, at least it’s coming out of the right place right?). We also decided to try the kick starter.
As a side note, if you’re trying to start a bike that hasn’t run for at least a decade, and you’re using the kick starter, wear boots. After about ten kicks (and a few slips) I thought that little metal rod (the remains of the kick starter pedal) was going to go through the bottom of my Chucks’.
Envision this: The CL is on its center stand, there is a battery laying next to it and jumper cables are running up to the battery compartment. I’m standing on the right-hand side of the bike, holding the Fuel IV in one hand (dripping gas), the throttle in the other and I’m trying to kick the kick starter with my left foot (the wrong foot) repeatedly, wearing tennis shoes…
…and then we heard a “pop”…
More furious kicking…
…pop, pop, pop
I kick a few more times and then my leg falls off. It’s time to get some boots.
Back outside in 5 minutes with the most reliable equipment ever made by HD on my feet, I turn the ignition back on, refill the IV and start kicking with various amounts of throttle, choke and prayer and…well you can see the results for yourself:
Before Matt arrived I started out with a few small adjustments to the recently overhauled carburetors. I thought there was a more thorough procedure outlined in my Clymer manual but most of the adjustment requires the bike to be running so that will have to wait.
Since we’re going with individual “pod”-style air filters one of the tasks on today’s agenda is removing the existing airbox. This was pretty straightforward once I realized that the two sides of the box are connected to each other using a rod that goes between the two sides. After bending the rod and denting one side of the airbox I realized this, removed the nut from one end and the whole thing fell away nicely. This really opened things up under the seat and there is now a lot more room to work with (which will make mounting the carbs a lot easier) but there are a few brackets and tabs and such that I think can go, later.
Since I needed some pipe clamps (on the list for the Fleet Farm run when Matt arrives) to mount the carbs I decided to move on to something easy like swapping out the handlebars. The CL come with these cool MX-style bars but I have a pair of even-cooler clubman bars I bought for my Monster years back but they didn’t fit.
I sliced the left grip to remove it and the pulled the screws from the left-side controls. For some reason, they didn’t just fall off at that point. I attributed this to decades of goo but after moving it around a bit I realized something more discouraging: all of the electrical for the hand controls are threaded through the handlebars.
I took a minute to contemplate what this meant and came to a few conclusions. The first was that it was very unlikely that the current wiring would be of the proper length for the new bars, so I’d be looking at extending it. If I’m going to extend it, I want to cut it back to a point where I could add a water-tight connector and hide it away, so that means back by the speedometer and tach. It also means I’ll need the connector itself, the wire, some way to “wrap up” the individual leads and I’ll be re-wiring the controls as well.
I was just about to cut the first wire when I realized that if I started this process now there was little-to-no chance the bike would run today. I didn’t have any great expectations that it would run anyway, but if I dove into this re-wiring effort (which required parts I didn’t have on hand) that there would be little chance of having everything in place to try and fire up the engine.
So instead I grabbed the Simple Green and started scrubbing until Matt arrived.
When Matt got there we grabbed a couple of cups of Black Gold and I went over the plan. We headed to Fleet to pick up a new battery, hose clamps, air filters and a fuel filter.
We returned with some hose clamps, a fuel filter (for a lawn tractor) and a battery charger (mine had burned up recently and I thought for $25 it would be worth a shot to try and revive the battery). I threw the battery on the charger and started the re-assembly with the carburetors. With the airbox removed this went quickly and easily and with the newly-cleaned carbs the throttle action was much improved (although I still need to at least lubricate the cable if not replace it at some point).
Once that was done I realized that I still had to hang the pipes and as I got started with that Matt grabbed the camera and started rolling. It had been awhile since I played with mounting the exhaust but after a few botched attempts I remembered how the two-piece flanges went on and the pipes were back on the bike.
Since they are considerably shorter than before the mounts that previously supported them no longer make sense, so for the moment they are simply bolted to the head. I imagine this isn’t a long-term solution.
With the carbs back on and the pipes hung, we were ready to drop in the battery, apply fuel and attempt to fire up the engine. I checked on my old battery and according to the charger it was almost done (one remaining bar on the 5-bar charge indicator). Thinking optimistically I pulled the battery off the charger and dropped it in the bike; there was almost no response. Realizing this was futile I pulled the battery and put it back on the charger, I had considered this possibility earlier in the week and had a plan B.
Matt and I both had the same thought as we eyed up my new bike, the Magna.
After learning the hard way how to get the battery out of the Magna we yanked it and set it up next to the CL. I found a pair of jumper cables in the garage and quickly attached them to the battery terminals of the bike, and then to the battery itself. I quick turn of the key indicated that the CL’s electrical system was not to blame for the previous batteries performance and the bike turned over without strain.
Next I dug out the Fuel IV previously mentioned on these pages and realized that the only gasoline I had on hand was from the last attempt at starting this bike, last summer. So, Matt and I headed to the corner gas station to buy about a half-gallon of gas and then headed back to the garage.
With the fuel lines connected I added a small amount of fuel to the IV and watched for leaks. Things looked pretty tight (before fuel would pour out of one of the bowls) so I turned the key, set the choke and hit the starter…
…nothing.
I was hoping that the reason we didn’t see a leak was not because there was no fuel flowing through the carbs. Let’s try again.
…nothing.
Maybe it doesn’t need the choke?
…nothing
The last time I turned the bike over I tested the ignition and there was spark, but that was months ago so we verified this the old fashioned way. Spark on both sides, but the plugs seem dry. I added more fuel to the IV (it was now started to drip from one of the bowl drains, at least it’s coming out of the right place right?). We also decided to try the kick starter.
As a side note, if you’re trying to start a bike that hasn’t run for at least a decade, and you’re using the kick starter, wear boots. After about ten kicks (and a few slips) I thought that little metal rod (the remains of the kick starter pedal) was going to go through the bottom of my Chucks’.
Envision this: The CL is on its center stand, there is a battery laying next to it and jumper cables are running up to the battery compartment. I’m standing on the right-hand side of the bike, holding the Fuel IV in one hand (dripping gas), the throttle in the other and I’m trying to kick the kick starter with my left foot (the wrong foot) repeatedly, wearing tennis shoes…
…and then we heard a “pop”…
More furious kicking…
…pop, pop, pop
I kick a few more times and then my leg falls off. It’s time to get some boots.
Back outside in 5 minutes with the most reliable equipment ever made by HD on my feet, I turn the ignition back on, refill the IV and start kicking with various amounts of throttle, choke and prayer and…well you can see the results for yourself:
Thursday, June 19, 2008
All-carb diet
I spent some quality time with the carbs in the basement tonight.
At first I was a bit worried to see that there were more parts in the "carb kits" that I bought than I could find a place for in my carburetors, however consulting my handy service manual indicated that my CL came with two different types of carb, and these extra pieces were for the "other" kind.
Other than that things went very smoothly and I had both carbs back together in about 90 minutes. I still need to adjust them (as much as you can before mounting them) but I was just happy to have all the pieces together that I called it a night.
I'm working on a longer post to outline everything I have planned for the bike at this point, I'll post it soon once I've updated the list.
Progress!
(BTW, I took a few pictures but my damn VQ1000 threw an error and I wasn't able to pull them off the camera...I think I'm going back to film...)
At first I was a bit worried to see that there were more parts in the "carb kits" that I bought than I could find a place for in my carburetors, however consulting my handy service manual indicated that my CL came with two different types of carb, and these extra pieces were for the "other" kind.
Other than that things went very smoothly and I had both carbs back together in about 90 minutes. I still need to adjust them (as much as you can before mounting them) but I was just happy to have all the pieces together that I called it a night.
I'm working on a longer post to outline everything I have planned for the bike at this point, I'll post it soon once I've updated the list.
Progress!
(BTW, I took a few pictures but my damn VQ1000 threw an error and I wasn't able to pull them off the camera...I think I'm going back to film...)
Monday, May 12, 2008
Some Progress
I finally got some time to work on the bike instead of the movie!
I've had the pipes in the basement with the intention to cut off the rusted-out mufflers for months. Last weekend I had a couple of hours to kill and I decided to head downstairs and take a crack at them.
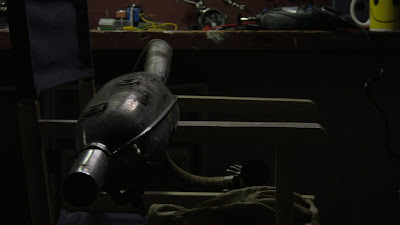
Probably the most distinctive feature of the CL350 (as opposed to the CB350) is the mufflers. Unfortunately they are also one of the most troublesome. Due to their shape and position, they collect water on the inside which is never good for steel, and most any un-restored example you find in the wild has major to complete rust in this area. To make things worse, the mufflers and the headers are one-piece, so there's no "bolt-on" option for replacing them.
Since this was one of my favorite parts of the bike I spent a lot of time trying to replace/repair them while retaining the stock look, thinking I could find some on Ebay (I've had luck with so many other parts). As it turns out, since they all had this problem non-rusted out examples fetch a nice sum and more than I'm willing to invest (this isn't a restoration project, I had to keep telling myself that). Finally a few months back I decided to damn the torpedoes and just slice off the mufflers and experiment. I figure the worst thing that can happen is I'll need to pick up a replacement set, which is what I was looking at in the first place.
So I set out with Dremel in hand and attacked the pipes. This makes for great movie footage as sparks fly and smoke rises, but it doesn't make for the cleanest cut possible. After seeing the results of this first attempt, I decided to give the hacksaw a try, which worked so well that I went back over the first pipe with the saw just to get a clean edge.
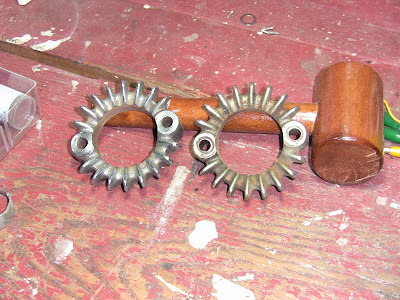
I had a little more time left and the pipes were so rusty that I decided to try taking a wire brush (attached to a power drill) to them and see if I could clean them up a bit. 30 minutes later they looked great (compared to before at least) and other than a few spots where the chrome had been removed (from a fall or something) they looked almost new. Well not new, but I think with some Brillo work they will look great. While I was at it I gave the clamps the wire wheel treatment as well and there was a huge difference (it didn't come out so much in the photo but trust me, it's very nice).
I spent a lot more time on this than I think I had to, but there was something so satisfying about making these parts look so nice. It makes me re-evaluate my approach to the bike, and now that I have a few months more to work on it's I'm considering taking a more thorough approach to cleaning the rest of the machine up.
...Then again it took me three months to get around to this one job so maybe I should just keep my ambitions low until the engine runs...
I've had the pipes in the basement with the intention to cut off the rusted-out mufflers for months. Last weekend I had a couple of hours to kill and I decided to head downstairs and take a crack at them.
Probably the most distinctive feature of the CL350 (as opposed to the CB350) is the mufflers. Unfortunately they are also one of the most troublesome. Due to their shape and position, they collect water on the inside which is never good for steel, and most any un-restored example you find in the wild has major to complete rust in this area. To make things worse, the mufflers and the headers are one-piece, so there's no "bolt-on" option for replacing them.
Since this was one of my favorite parts of the bike I spent a lot of time trying to replace/repair them while retaining the stock look, thinking I could find some on Ebay (I've had luck with so many other parts). As it turns out, since they all had this problem non-rusted out examples fetch a nice sum and more than I'm willing to invest (this isn't a restoration project, I had to keep telling myself that). Finally a few months back I decided to damn the torpedoes and just slice off the mufflers and experiment. I figure the worst thing that can happen is I'll need to pick up a replacement set, which is what I was looking at in the first place.
So I set out with Dremel in hand and attacked the pipes. This makes for great movie footage as sparks fly and smoke rises, but it doesn't make for the cleanest cut possible. After seeing the results of this first attempt, I decided to give the hacksaw a try, which worked so well that I went back over the first pipe with the saw just to get a clean edge.
I had a little more time left and the pipes were so rusty that I decided to try taking a wire brush (attached to a power drill) to them and see if I could clean them up a bit. 30 minutes later they looked great (compared to before at least) and other than a few spots where the chrome had been removed (from a fall or something) they looked almost new. Well not new, but I think with some Brillo work they will look great. While I was at it I gave the clamps the wire wheel treatment as well and there was a huge difference (it didn't come out so much in the photo but trust me, it's very nice).
I spent a lot more time on this than I think I had to, but there was something so satisfying about making these parts look so nice. It makes me re-evaluate my approach to the bike, and now that I have a few months more to work on it's I'm considering taking a more thorough approach to cleaning the rest of the machine up.
...Then again it took me three months to get around to this one job so maybe I should just keep my ambitions low until the engine runs...
Monday, January 7, 2008
Matt's Interview
Last weekend we shot Matt's "progress report" interview and discussed his project bike and where things are at now that we're about half-way to the spring crud deadline (since we began production on the film).
I have to say that Matt's bike looks a lot better than mine does right now, and for all practical purposes he's a lot closer to being road-worthy than I am.
Shooting that interview definitely motivated me to get back in the garage, as does the unseasonably warm weather we're currently experiencing here. The next thing I need to do, re-assemble the carbs, I can do in the comfort of my basement workshop so the only thing standing in the way there is finding the time. After that it's back to the garage to re-attach the carbs, re-plumb the fuel lines and try again to get the motor to start. Really not that much to do before attempting to fire it up again if you think about it.
After last weekend I can definitely say, like most things that require discipline, fixing a motorcycle is definitely easier when you have a friend doing the same. Fixing a motorcycle isn't all that hard, there is a financial cost to it but if you do all the labor yourself (and fabricate/substitute the less common parts) it's not terribly expensive. Technical skill is required, but most of this you can acquire by reading and through trial-and-error. Bill pointed out that the best way to learn these skills is by doing the work yourself, making mistakes and then trying again until you get it. If you look at the lost time and money of this process, it's still cheaper than going to school and there is little chance of falling asleep working on your own bike.
There is a part of Zen and the Art of Motorcycle Maintenance where the narrator discusses "gumption", and says something like "without gumption the motorcycle may never be fixed, but with gumption the motorcycle cannot resist being fixed" (sometime I'll look up the exact quote) but I think the point is that the only thing that will stop a project such as this is the mechanic's choice to give up. If you can avoid this, the motorcycle will run again…
…eventually
I have to say that Matt's bike looks a lot better than mine does right now, and for all practical purposes he's a lot closer to being road-worthy than I am.
Shooting that interview definitely motivated me to get back in the garage, as does the unseasonably warm weather we're currently experiencing here. The next thing I need to do, re-assemble the carbs, I can do in the comfort of my basement workshop so the only thing standing in the way there is finding the time. After that it's back to the garage to re-attach the carbs, re-plumb the fuel lines and try again to get the motor to start. Really not that much to do before attempting to fire it up again if you think about it.
After last weekend I can definitely say, like most things that require discipline, fixing a motorcycle is definitely easier when you have a friend doing the same. Fixing a motorcycle isn't all that hard, there is a financial cost to it but if you do all the labor yourself (and fabricate/substitute the less common parts) it's not terribly expensive. Technical skill is required, but most of this you can acquire by reading and through trial-and-error. Bill pointed out that the best way to learn these skills is by doing the work yourself, making mistakes and then trying again until you get it. If you look at the lost time and money of this process, it's still cheaper than going to school and there is little chance of falling asleep working on your own bike.
There is a part of Zen and the Art of Motorcycle Maintenance where the narrator discusses "gumption", and says something like "without gumption the motorcycle may never be fixed, but with gumption the motorcycle cannot resist being fixed" (sometime I'll look up the exact quote) but I think the point is that the only thing that will stop a project such as this is the mechanic's choice to give up. If you can avoid this, the motorcycle will run again…
…eventually
Wednesday, December 26, 2007
More interviews scheduled
We've got two major production events coming up, the first is an interview session that we'll be shooting with the two "mechanics" featured in the film who will discuss their project bikes, their current progress and their expectations for the next few months leading up to the spring 'run.
Secondly we have secured an interview with Lyall Sharer (Sr.), one of the Slimey Crud's and owner of Sharer Cycle Center in Verona, WI. We are particularly excited about this interview and hope to learn more about the origin of the run and the Slimey Crud Motorcycle Gang.
In related events, our last documentary release, "Breakdown" has been selected by the Beloit International Film Festival and will be screening on January 18th, 2008. You can find out more about "Breakdown" at BIFF by visiting the production company's website at http://2soc.net
Secondly we have secured an interview with Lyall Sharer (Sr.), one of the Slimey Crud's and owner of Sharer Cycle Center in Verona, WI. We are particularly excited about this interview and hope to learn more about the origin of the run and the Slimey Crud Motorcycle Gang.
In related events, our last documentary release, "Breakdown" has been selected by the Beloit International Film Festival and will be screening on January 18th, 2008. You can find out more about "Breakdown" at BIFF by visiting the production company's website at http://2soc.net
Subscribe to:
Posts (Atom)
